Tips And Tricks To Free Up Disk Space And Hidden Storage On Your Mac
We know how busy we get with your digital devices. Among all the daily used hardwares, our Macbooks have become an irreplaceable tool for us. A centerpiece or in some word necessity to our personal and professional lives. From storing cherished memories captured in photos and videos to safeguarding essential documents, our Macbooks become vaults for valuable data.
Moreover, they serve as powerful platforms for work, creativity, and entertainment, enabling us to perform tasks, create art, and consume media seamlessly. However, as we continually add more files, applications, and updates, our Macbook’s storage can quickly become overwhelmed and filled with unnecessary documents or files which we might not need for some time later.
Too many large files stored in our Mac can result in sluggish performance, reduced efficiency, and the frustration of running out of space at critical moments. Today’s few small steps will help you easily clean your unwanted files or softwares in your Mac which you don’t require.
Easy Steps To Free Up Space On Mac
Let’s learn some simple steps about how to free-up or clean unnecessary files from your Mac. Before jumping right into the steps, do remember to keep a backup of your necessities which you don’t want to accidentally delete.
Your Mac can show you how much storage space is being used by various categories of files, and how much space is available for additional files. As you take the steps in this article to free up storage space, this storage information updates automatically.
Here’s the steps down below for the older and latest models separately:
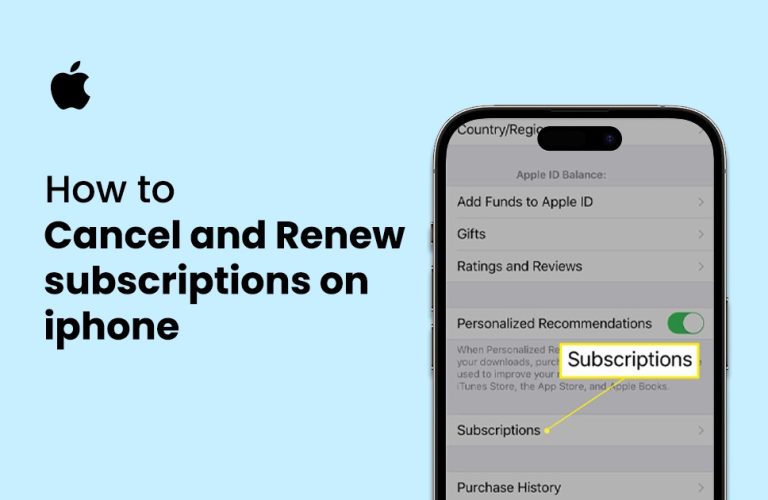
1. Previous/Earlier Versions of macOS:
➜ Choose Apple menu;
➜ About This Mac;
➜ Now click on Storage;
When clicked on Storage you will see how much storage you have left and some details about which type of storage (Photos, Documents or Other users) are taking up your space. This might take a moment to load if your Mac has a larger storage or files.
➜ Next Click on Manage;
➜ If you are iCloud is turned on, then your first recommendation would be store in iCloud (click on store in iCloud to save your files on iCloud);
➜ Click on Optimize button from “Optimize Storage” option to clean the files like movies or Tv-shows you have already watched on iTunes;
➜ Next, if you turn on “Empty Trash Automatically” option, files you have deleted will be automatically permanently deleted after a 30 day time period;
➜ At bottom, you will find “Reduce Clutter” option, if you click review files then you can see quickly identify large unnecessary files which needs to be deleted.
2. Manually Storage Cleaning Option
➜ For manually deleting your files from your Mac, go to Recommendations options on the left side of Manage Storage;
➜ There you will find all the applications, documents, drive, music or even other users account space details;
➜ Click on certain Applications, then select an app > click delete and confirm to delete and free-up your Mac.
➜ If you see any password or touch ID for confirmation just use your pass and confirm the delete process to free-up your Mac.
3. macOS Ventura or later models:
➜ Click on Apple menu;
➜ Select System Settings;
➜ Click General in the sidebar;
➜ Inside the general options click Storage on the right (Below Software Update).
It might take a few moments to load your files to be shown depending on your Mac storage size or file storage size. It’s pretty much similar to older macOS with slightly different UI icons.
➜ If you are iCloud is turned on, then your first recommendation would be store in iCloud (click on store in iCloud to save your files on iCloud);
➜ Click on Optimize button from “Optimize Storage” option to clean the files like movies or Tv-shows you have already watched on iTunes;
➜ Next, if you turn on “Empty Trash Automatically” option, files you have deleted will be automatically permanently deleted after a 30 day time period;
4. Manually Storage Cleaning Option on macOS Ventura
➜ To manually free space, you have click on information icon next to a category;
➜ When clicking on the Application’s option, you can see lots of installed applications;
➜ Select on any of the unused application or duplicate application and click on the bottom delete option to delete the file or application and free-up space.
You can also move your large files to iCloud or other third party cloud storage services to free-up your Mac’s disk storage.
Tips and Tricks to Free Disk Easily On Macbook
Follow these certain tips and tricks to stay on low in terms of disk saving. Down below are the few easy tips for you to follow to keep your system disk low on your Mac. They are:
- Clean your Mac Disk Regular Basis: Use Disk Utility to remove temporary files, system caches, and other unnecessary files. This simple step can free up significant space and improve performance.
- Uninstall Unused Applications: It is wise to uninstall files from time to time from your precious Macbooks. We understand the necessity of your files, although sometimes we install files which
- Store Files in the Cloud: This storing files in cloud portals is not a process to free up your Mac, although it’s a simple way to free up space and keep an extra storage rather than your current Mac Storage. You can use Apple’s built- in iCloud or use other free cloud storage apps like Google Drive, MEGA.NZ, DropBox or Microsoft’s OneDrive to store your files.
- Delete Duplicate Files: Sometimes we keep duplicate files or media files and even install softwares for two times on your Mac. It’s really a silly mistake which we accidentally make and build up our space on our Mac. So checking applications files in the storage option of Mac and deleting duplicate files is a huge save to free-up Mac.
- Manage Downloads Folder: Regularly clean and go through your downloads folder. Most of the time we download files and suddenly forget about them, keep a reminder or alarm to check files you might really need and delete files from the download folder, after its work is done.
- Compress Files: Compressing files reduces their size and can free up a significant amount of space. Some Third-Party softwares like WinRAR or 7-Zip to compress infrequently accessed files and allows you to shrink original file size or resize back when needed.
- Use External Storage Devices: Believe it or not external storage is a lifesaver when it comes to keeping your files or personal media files organized and backed up. Besides backing up, you can also use it as emergency data storage to clean up your Mac whenever you might need to.
- Clear Browser Cache: When you browse the internet through your “Safari” browser, some sites images or thumbnails might and even downloaded files may end up stored as cache. These web browsers store a cache of files to speed up loading times, but over time, this cache can grow quite large. This is why cleaning web browser cache or history from time to time is a necessity.
- Empty the Recycle Bin/Trash: Deleting files doesn’t immediately remove them from your Macbook; they are moved to the Recycle Bin or Trash. Try to always check on your trash or Bin of your Mac, and delete unnecessary files or large movie/ video files specially which are holding a big space of your Mac.
Conclusion
Long story short, keeping your Macbook clean is essential for ensuring smooth and efficient performance. By implementing the tips and tricks outlined in this guide, you can effectively manage your storage, prevent clutter, and keep your Macbook running at its best.
Regular maintenance, such as cleaning up disk space, uninstalling unused applications, and managing files efficiently, can significantly extend the life of your Macbook and enhance your overall experience. Whether you’re using your Macbook for work, designing creative projects, or using it for any personal activity, having a well-organized and spacious storage system will let you operate more efficiently.
By taking proactive steps to manage your storage, you can ensure that your Macbook remains reliable and powerful just like before. Follow Apple Gadgets blog page for more informative info about smartphone and Apple devices.

Rabbi Rahman enjoys talking about tech, gadgets and especially smartphones. He’s been writing about them for four years . His favorite topic is discussing innovations in devices, engaging in conversations with others who share his passion for technology.